I found the overall project challenging but not impoosible to complete i did enjoy this project even though the mapping part was the hardest bit and took hours.
Doing this tutorial personally myself i found that i have learned alot more in the program like using certain fetures such as all the cut and welding and creating tools makes editing objects/polys more easier, ive started to use control + Z if u do something wrong in the program and a few other quick ways to do things... i also learnt the same with photoshop.
Things that i didnt think went well on the project was creating meshes i think i need to be more careful in how im making them or mabe think more about the shape of objects that im creating as in the project i found myself getting ahead then having to go back and edit some bits as i had not done things correctly or had bits sticking out, also mabe have spent more time on my skin to make it perfect as the images i was working with i feel was poor quality which made it hard at times.... if i had more time i would like to add some more features to it like mabe a necklace.
Friday, 22 October 2010
Thursday, 21 October 2010
Making The Skin
 My head is a bit bald Sooo Time To Add Some Hair :)
 This is the final skin i used to edit in photoshop... i learened a few new tools in photo shop witch was the patching tool which was also very useful in coverin up lines and mixing in the colours on your face i also used liquidfy to move the mouth in the right place as it was very hard to get in the right place using the clone stamp tool..
 this was a test to make sure it went into 3dsmax from photo shop as wen i started saving and then trying to look in £dsmax it went all fuzzy in a million different colours but i saved my photoshop file as a PNG.file and it came out fine...
Uvw Mapping
 Final mesh makes a bit more sense in where my face is and it is alot closer together the only problem i had with this is that the pixalising of the the picture it wasnt as clear as it could of been i think it would have been move helpful if it was clearer!
 This is What the Wrong mesh looked lik as u can see the nose is way too far apart and if i was to apply this to my face the skin would not match up in the correct places so i had to go back and redo the whole process agen :(
 the wrong mesh because my mesh on the model was inncorrect as when i flattened it the meshed apperred to far apart as i had not flatterened them properly and streched the squares nicely all over the object,,, this was due to my mesh on the actual head being a bit out of place i had a few spare polys hangin on the back of the head which disruppted the mesh eek!! :/
 Final Checkered Material..
 First time straigtening out the chequers u can see they are very much still stretched!
To Do unwrap uvw i used a chequered material in the material editor to make sure that it was all even so that when i placed the skin onto the object it wouldnt be stretched and would follow around the boject quiet nicely....
Tuesday, 19 October 2010
The Ear
 To Make the ear again i used the same method as i did for the face using the spline to make the lines using the typology from the photoshop photos and then pulling all the vertex's out to make it 3D...
Making The Head....
 When The head Was Fully Made Using Shift And Pulling the Pollys Down i did come across a few problems with creating loads of triangle which was realli annoyin but i found that now i knew how to use the tools better like create and cut i found them really easy to edit..
This way my first attempt at the head it didnt come out to well so i decided to remake it agen as i qorked out what i had to do so that it would be easier to make second time around... i didnt make it big enough and i hat to strech the head n then the shape of the head did not come out to nice..
.

To make the head had to go back into photoshop and edit the typology of the head to get the shape, then back into 3dsmax to get a sphere and play around with it until it matched the size of my head... Then Using a Window & Crossing Tool to delete the pollys that i didnt need... i snapped the points together to the head once they are connected i used the loop and collapse tool to make less pollys which is a very good tool i found and useful to know!....Tto attach it to the face i selected it and clicked edit poly and then attach :)
Wednesday, 13 October 2010
Nose, Eyes And Mouth


Problems i came across creating the mesh...
I had a problem with my mesh which i had welded to getheres as there where to many pollys and made it difficult to get the face structure as well as the mesh drawn on photoshop was to straight and not giving enough definition around the nose area.....
Wednesday, 29 September 2010
Welding
Welding The Vetex's...

I needed to attach all the edges together so i used the modifier panel to wels all the vertex's together, to do this i selected the plane and used the weld tool and made sure the threshold was correct...

I needed to attach all the edges together so i used the modifier panel to wels all the vertex's together, to do this i selected the plane and used the weld tool and made sure the threshold was correct...
Weld Threshold:
Before : 341
After:341
After 1 click : 0.01
Creating The Mesh..

First of all i had to sort the views of the planes so i was able to create the mesh carefuly, to do this i learnt a new way buy using the view point > configuire > Then select the layout which suits for what you need to do.. i think this was one of the most useful things ive learnt as its hard gettin the correct view somtimes i feel it has helped me a bit. i also smoothed & highlighted to sho the image at differnt angels and used the program without using the grid and using the icons at the bottom to zoom in differnt angles.
After i had the correct view it was time to create the mesh.. to do this i clicked on shapes selected the line tool and made sure both settings on creation method where selected corner then i also added the magnet tool at the top ( selecting vertex) to snap all the lines together and close all splines...
As i started selecting my quads and creating the mesh i found that sometimes the lines wouldnt let me click where i wanted to so i had to edit the thickness of the vertex to do this i right clicked on the magnet tool > point > vertex> adjust raduis > click on pixels and change the settings....
Converting The Mesh Into A Surface:
 To convert it into a surface i select a quad on the mesh > right clicked editable poly > Go to Edit Geometry> Attach> Attach All in the List then u get a flat plain like in the screen shot.To get the edges up i used the view port to add the edges faces..
Importing The Images In 3dsmax...

To put our image on the plane i had to import the image on to a plane in 3dsmax to do this i used the material editor and added it through a bitmap... Once it Was Selected onto the plane i then used the modifer list to use the UVW Map to get the correct size of our image, However ...
A problem i came across when importing my image was that it was not showing up the lines i had drawn on my face in photoshop and that the images needed to be reloaded to make them more clearer to this i clicked on Customise > Prefrences > View ports > Configure Driver > Click Bitmap Sizes (Both) and to Reload the Image i went into Material Editor and went into Bitmap and went into the Bitmap Parematers to Reload the image and now i have a nice clear image to work from :)
Last of all on this part of the steps... Freezing The Images... To Do this is pretty simple you just go into the options an edit the objects and unclick see in gray...
Thursday, 23 September 2010
Editing Images In Photoshop
 Final Mesh !
1st attempt came out wrong as i needed to make sure there where no tirangler shapes or 5 sided shapes in the mesh so that when iput it in 3dsmax it would b easier to work with... i also realised i didnt need to draw red lines on the other side of the image... DOoH !!!*
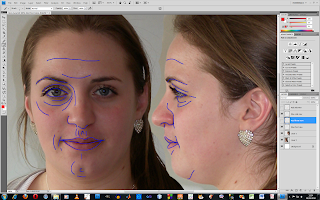 Drawing Blue lines on the face to get the lines in the facial expressions...
This is the beginning of the process of making our faces, ive edit the images using photoshop using a lens distortion and rules to line up the face, the red and blue lines are typolgylines are the key feteaures of the face which we wil need to use later on :)
Wednesday, 22 September 2010
Week 1

 Taking Pictures Of Our Heads... !!
We Was First Introduced to the Brief of the project it looked pretty cool making our faces seems like a challenge too!
Subscribe to:
Comments (Atom)