Wednesday 29 September 2010

Welding

Welding The Vetex's...


I needed to attach all the edges together so i used the modifier panel to wels all the vertex's together, to do this i selected the plane and used the weld tool and made sure the threshold was correct...

Weld Threshold:

Before : 341
After:341

After 1 click : 0.01

Creating The Mesh..


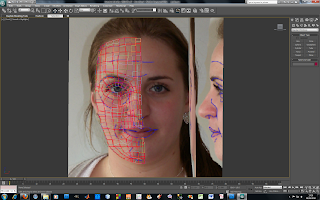
First of all i had to sort the views of the planes so i was able to create the mesh carefuly, to do this i learnt a new way buy using the view point > configuire > Then select the layout which suits for what you need to do.. i think this was one of the most useful things ive learnt as its hard gettin the correct view somtimes i feel it has helped me a bit. i also smoothed & highlighted to sho the image at differnt angels and used the program without using the grid and using the icons at the bottom to zoom in differnt angles.

After i had the correct view it was time to create the mesh.. to do this i clicked on shapes selected the line tool and made sure both settings on creation method where selected corner then i also added the magnet tool at the top ( selecting vertex) to snap all the lines together and close all splines...

As i started selecting my quads and creating the mesh i found that sometimes the lines wouldnt let me click where i wanted to so i had to edit the thickness of the vertex to do this i right clicked on the magnet tool > point > vertex> adjust raduis > click on pixels and change the settings....

Converting The Mesh Into A Surface:

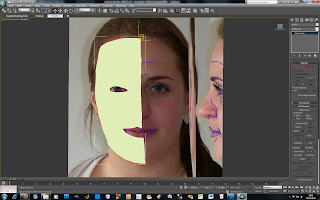
To convert it into a surface i select a quad on the mesh > right clicked editable poly > Go to Edit Geometry> Attach> Attach All in the List then u get a flat plain like in the screen shot.To get the edges up i used the view port to add the edges faces..

Importing The Images In 3dsmax...


To put our image on the plane i had to import the image on to a plane in 3dsmax to do this i used the material editor and added it through a bitmap... Once it Was Selected onto the plane i then used the modifer list to use the UVW Map to get the correct size of our image, However ...

A problem i came across when importing my image was that it was not showing up the lines i had drawn on my face in photoshop and that the images needed to be reloaded to make them more clearer to this i clicked on Customise > Prefrences > View ports > Configure Driver > Click Bitmap Sizes (Both) and to Reload the Image i went into Material Editor and went into Bitmap and went into the Bitmap Parematers to Reload the image and now i have a nice clear image to work from :)

Last of all on this part of the steps... Freezing The Images... To Do this is pretty simple you just go into the options an edit the objects and unclick see in gray...

Thursday 23 September 2010

Editing Images In Photoshop

Final Mesh !

1st attempt came out wrong as i needed to make sure there where no tirangler shapes or 5 sided shapes in the mesh so that when iput it in 3dsmax it would b easier to work with... i also realised i didnt need to draw red lines on the other side of the image... DOoH !!!*

Drawing Blue lines on the face to get the lines in the facial expressions...

This is the beginning of the process of making our faces, ive edit the images using photoshop using a lens distortion and rules to line up the face, the red and blue lines are typolgylines are the key feteaures of the face which we wil need to use later on :)


Wednesday 22 September 2010

Week 1


Taking Pictures Of Our Heads... !!
We Was First Introduced to the Brief of the project it looked pretty cool making our faces seems like a challenge too!